The psoas muscle (pronounced SO-as) is the little engine that could. While most athletes focus on bigger and more visible muscles and joints, the psoas is an incredibly important, but hidden, muscle that affects your athletic performance, strength, endurance and risk of injury. Alas, many fitness enthusiasts, martial artists, and athletes don’t get this muscle the attention that it deserves.
What and Where is the Psoas Muscle?
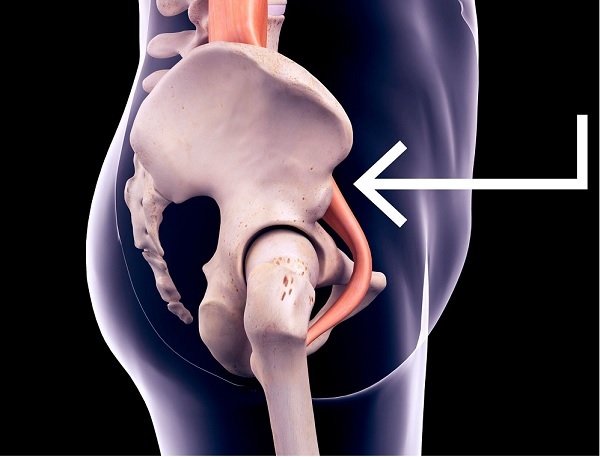
You’ve likely familiar with your hip flexors. The deep muscle known as the psoas is the biggest, and more importantly the strongest, muscle in your hip flexors.
You’ll find the psoas running along the side to top of your hips (see arrow in illustration above). One end is attached to your femurs. The muscle then runs upward, through your entire pelvis, to your spine where you’ll find it attached from the 5th lumbar vertebrae (the lowest vertebrae in the area) all the way up to the 12th vertebrae in the thoracic region (right below your lowest abdominal muscles).
As you can tell, this muscle is very far-reaching, and while it’s essential for a range of movements, its primary focus is on hip flexion. To put it in layman’s terms, according to the American Council on Exercise, hip flexion is the ability to “lift your thigh upward in front of your body.”

When you workout, it is the psoas muscle that helps with running, walking, lifting your leg, stair climbing and more. And because it attaches along your entire spine up to your abdominals, you need a strong and flexible psoas for twisting, bending and picking things up.
What Happens When You Have a Weak or Excessively Tight Psoas Muscle?
Anyone can encounter the negative side effects of an injured, tight or immobile psoas. However, according to the Cleveland Clinic, you’re especially at risk if you are a runner or if you enjoy any workouts or movements that involve plyometrics. This makes grapplers and strikers especially susceptible since plymetrics is a huge part of the training regimen.
Example of plyometric movements that can put a lot of strain on your psoas include:
- Jumping rope
- Box jumps
- Squat jumps
- Burpees
- Pistol squat roll with jumps
- Single-led deadlines into a jump
Symptoms of a weak, injured or tight psoas can sometimes include:
- Groin pain
- Pelvic pain
- Tension or soreness in your legs, hips and buttocks
- Lower back pain (one of the most common symptoms)
But that doesn’t mean you can’t enjoy plyometrics and other movements that put a strain on your psoas muscle and overall hip flexors. After all, such movements are powerful fat-torching exercises, improve muscle strength and endurance, and boost your metabolism.
But if you do enjoy such exercises, it’s important that you invest in the health, wellness and well-functioning of your psoas muscle.
How to Strengthen and Care For Your Psoas Muscle
1. Warm up your psoas before doing plyometrics or going for a run/jog
Just like any other muscle, warm-ups can help prepare the psoas for optimal performance and may reduce some risks of injury and strain.
One powerful psoas stretch is the reclining big toe pose (supta padangustasana). You’ll need an exercise band or rope to do this, because a band will let you get deeper into a stretch than your natural mobility may allow (and thus get deep into your hips and reach your psoas).
Psoas stretch directions:
- Lie flat on the ground, facing upward.
- Wrap the band around your left foot and lift your leg straight into the air while keeping your leg straight.
- Apply gentle tension to the band, pulling your leg vertical into the air.
- Your goal is to create at least a 90-degree angle between your leg that’s in the air and the leg that’s still on the ground. It’s at this point that your psoas is fully activated.
Hold for 20-30 seconds before lowering your leg. Repeat with the opposite leg, and switch back and forth for 3-5 rounds.

Reclining big toe pose
Other warm-up movements include v-sits and hanging knee raises. Remember, your goal is to gently warm up the psoas and not actually do an abdominal workout, so slow, gentle, weight-free movements are ideal.

V-sits

Hanging knee raises
2. Avoid prolonged static positions that shorten and tighten the psoas
The average American office worker sits for a whopping 15 hours a day, which is the longest in recorded history, warns Forbes business magazine. This record-breaking amount of sedentary activity doesn’t just have ramifications for your strength, weight gain and metabolism, but all that sitting tightens and shortens your hip flexors.
Limit your sitting as much as possible. If your job requires time at a desk, consider a standing desk or setting an alarm on your smartphone and standing up for a stretch or a walk every 45 minutes.
When you are sitting, practice good posture. Slouching or leaning back in your chair further weakens your psoas.
3. Rest and restore your psoas muscle
Just like other muscle groups, rest and recovery is essential for muscle repair and muscle strengthening. After all, it’s during your rest days that your muscles can synthesize protein and rebuild stressed or torn tissues (not your actual time in the gym).
The problem with the psoas is that it’s involved in so many movements. So while you might do exercise splits, such as pull days and push days (i.e. the popular “PPL” routine), or split your workouts between upper body and lower body, your psoas may not be getting the rest that your other muscles might be receiving.
Pay attention to your movements and make sure you’re giving your hip flexors a true rest day every 4-5 days, or even more frequently if you enjoy explosive movements like jumps and squats.
You can also try active resting for your psoas. Lie down with your knees bent and your feet a foot or two away from your glutes. Breathe gently, bringing your awareness into your abdomen.
Consciously focus on not tightening your abs, tucking your pelvis, or pressing your lower back into the ground.
Stay in this active awareness and maintain no tension in your hips for 20 to 30 minutes. This will relax the psoas muscle and other hip flexors, many of which are under constant tension throughout your day.
4. Invest in a psoas-releasing tool
Physical manipulation and myofascial release is an effective way to reduce muscle tension, ease muscle pain and flush post-workout metabolic waste like lactate acid. Unfortunately, your psoas muscle is deep in your hips and spine, making traditional manipulation and myofascial tools (such as massage balls or foam rollers) ineffective.
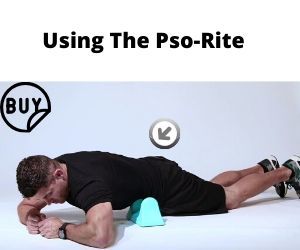
Instead, try a psoas massager. Popular and effective examples include the PSO-RITE and the PSO-MINI.
These simple pressure-producing tools press deep into your muscle tissue using your body’s natural bodyweight, helping to target the psoas and other deep tissues and release tension and tightness.
